> ## Documentation Index
> Fetch the complete documentation index at: https://docs.dialogshift.com/llms.txt
> Use this file to discover all available pages before exploring further.
# Set up the Make.com integration
> Connect your DialogShift Journey Messaging with Make.com to combine flows with virtually any external service
[Make.com](https://make.com) is an automation platform for connecting different services. With the Make.com integration, you can connect Journey Messaging in both directions to almost any external system:
* **Outgoing**: A Journey Messaging flow starts a scenario in Make.com — optionally with booking and/or primary guest data.
* **Incoming**: A Make.com scenario starts a Journey Messaging flow — optionally filtered by a specific booking ID.
**Terminology**: What DialogShift calls a "flow" is called a "scenario" on Make.com. Because the two systems' capabilities partly overlap, there is often more than one way to implement a use case.
This page covers the one-time setup. Once the connection is in place, head over to the tutorials for [outgoing triggers](/en/journey-messaging/make-com-outgoing) and [incoming triggers](/en/journey-messaging/make-com-incoming).
## Prerequisites
A DialogShift account with Journey Messaging fully configured and activated
An account at [Make.com](https://make.com)
## Step 1 — Add the Make.com app to your organization
The DialogShift app needs to be added to your Make.com organization once. Because the app is currently in beta, it is not yet publicly listed in the Make app store — we will send you a personal installation link on request.
Drop us a line at [support@dialogshift.com](mailto:support@dialogshift.com) and we'll send you the installation link.
The link then needs to be opened and confirmed by an **administrator of the Make.com organization** — afterwards the app is available to all users of that organization.
Once the app is available in the official Make app store, a simple search inside Make will be enough and the installation link will no longer be needed.
## Step 2 — Create an API key in DialogShift
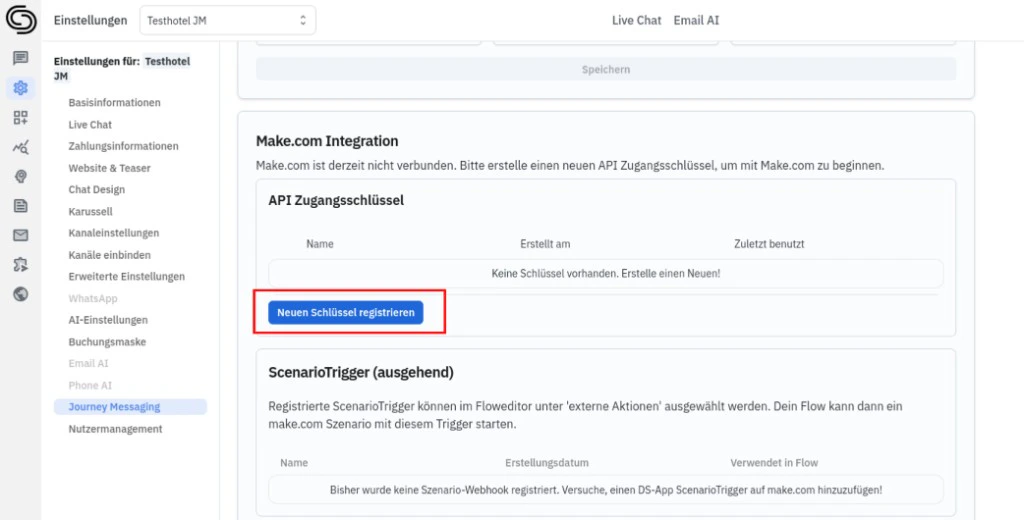
In the DialogShift app, open **Settings** >> **Journey Messaging**. Right below the GDPR settings you will find the section **Make.com Integration**.
Click **Register new key**. In the dialog, select **Make.com** as the service (if it is not already preselected) and confirm with **Generate new key**.
 The key should be treated like a password and is shown **only once**. We recommend storing it directly in a password manager. The button next to the key field copies it to your clipboard.
## Step 3 — Create a connection inside Make.com
No matter which direction you want to use the integration in — the **first time** you use the DialogShift app inside Make.com you must create a connection to DialogShift.
In all DialogShift modules you will find the button **Create a Connection** in the setup popup:
In the DialogShift module, click **Create a Connection**.
Give the connection a name (e.g. `DialogShift`) and paste the API key you just generated into the **API Key** field.
Hit **Save** — DialogShift is now stored as a connection in Make.com. You can reuse this connection across all your future scenarios.
The follow-up tutorials assume that this connection already exists.
## What's next?
A Journey flow starts a Make.com scenario — for example to push booking data into an external spreadsheet.
A Make.com scenario starts a Journey flow — for example when a payment provider has processed a payment.
## Troubleshooting
In the Journey Messaging settings under **Make.com Integration** simply generate a new key and store it in Make.com. You can disable the old key with the delete button.
Make.com accounts have their own rate limits and quotas — free accounts in particular hit those limits quickly. The limits are set by Make.com directly and may need to be increased through your Make plan.
Make.com runs its own scheduler. Latency is usually in the range of a few seconds; under high throughput Make may intentionally delay execution to protect its platform.
Make.com is primarily an English-language platform. There is currently no localization mechanism for custom apps — a German version would only exist in German.
The key should be treated like a password and is shown **only once**. We recommend storing it directly in a password manager. The button next to the key field copies it to your clipboard.
## Step 3 — Create a connection inside Make.com
No matter which direction you want to use the integration in — the **first time** you use the DialogShift app inside Make.com you must create a connection to DialogShift.
In all DialogShift modules you will find the button **Create a Connection** in the setup popup:
In the DialogShift module, click **Create a Connection**.
Give the connection a name (e.g. `DialogShift`) and paste the API key you just generated into the **API Key** field.
Hit **Save** — DialogShift is now stored as a connection in Make.com. You can reuse this connection across all your future scenarios.
The follow-up tutorials assume that this connection already exists.
## What's next?
A Journey flow starts a Make.com scenario — for example to push booking data into an external spreadsheet.
A Make.com scenario starts a Journey flow — for example when a payment provider has processed a payment.
## Troubleshooting
In the Journey Messaging settings under **Make.com Integration** simply generate a new key and store it in Make.com. You can disable the old key with the delete button.
Make.com accounts have their own rate limits and quotas — free accounts in particular hit those limits quickly. The limits are set by Make.com directly and may need to be increased through your Make plan.
Make.com runs its own scheduler. Latency is usually in the range of a few seconds; under high throughput Make may intentionally delay execution to protect its platform.
Make.com is primarily an English-language platform. There is currently no localization mechanism for custom apps — a German version would only exist in German.