> ## Documentation Index
> Fetch the complete documentation index at: https://docs.dialogshift.com/llms.txt
> Use this file to discover all available pages before exploring further.
# Make.com: Incoming trigger
> A Make.com scenario starts a Journey Messaging flow — optionally filtered by a specific booking ID
With the incoming trigger, a Make.com scenario starts a Journey Messaging flow inside DialogShift. This lets you send messages based on any external event — for example when a payment provider has processed a payment, or when a third-party system fires an event.
This guide assumes that you have [already set up the Make.com integration](/en/journey-messaging/make-com-setup) and that the connection between Make.com and DialogShift is in place.
## Example scenario
In this guide we will build the following use case:
> As soon as a payment provider has processed a guest's payment, the guest should receive a confirmation message.
We will focus on the DialogShift side and assume that the rest of the Make scenario (e.g. the webhook from the payment provider) already exists.
## Step 1 — Create the external flow trigger in Journey Messaging
Create a new flow or pick an existing one that should be started from Make.com.
At the top of the flow, on the trigger, choose **Add new external flow trigger**.
Give the flow trigger a meaningful name — this name will later show up in Make.com. For our example: `Make: payment data processed`.
Add the desired actions to the flow (e.g. sending a template) and save it.
The finished flow looks like this:
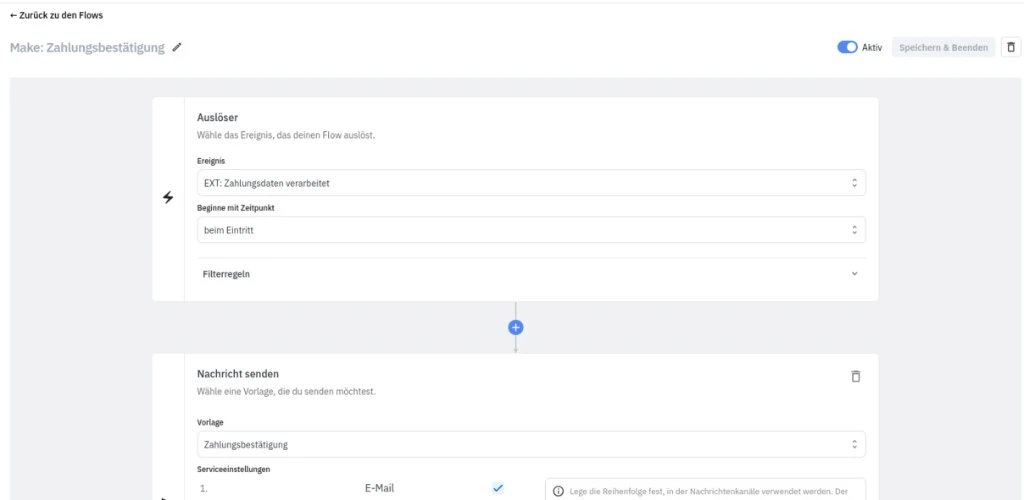 The external trigger is marked with **EXT** in the flow editor. This flow runs as soon as Make.com sends the corresponding event.
The same external trigger can be used for **multiple flows** — handy if a single Make scenario should start several JM flows at the same time. Just pick an existing external trigger when adding it.
## Step 2 — Send the trigger from Make.com
Create a new scenario in Make.com or open the one that should trigger the DialogShift flow.
Click **+**, search for **DialogShift** and select the app.
Pick the action **Start DS Flow**.
If the connection to DialogShift does not yet exist, you can create it right here. Find the instructions in [Set up the Make.com integration](/en/journey-messaging/make-com-setup#step-3-—-create-a-connection-inside-make-com).
Under **DS FlowTrigger** you will see all triggers you created in the flow editor — including `Make: payment data processed`.
In the field **Booking ID of guest** enter the full booking ID. The flow will then start exclusively for the journeys that belong to this booking.
The booking ID is critical: it is the only way for Journey Messaging to know which journeys the instruction applies to.
In our example the booking data comes from the payment provider's webhook — we can reference the booking number from there with a single click. With a different data source you can of course populate the booking number in any other way.
The external trigger is marked with **EXT** in the flow editor. This flow runs as soon as Make.com sends the corresponding event.
The same external trigger can be used for **multiple flows** — handy if a single Make scenario should start several JM flows at the same time. Just pick an existing external trigger when adding it.
## Step 2 — Send the trigger from Make.com
Create a new scenario in Make.com or open the one that should trigger the DialogShift flow.
Click **+**, search for **DialogShift** and select the app.
Pick the action **Start DS Flow**.
If the connection to DialogShift does not yet exist, you can create it right here. Find the instructions in [Set up the Make.com integration](/en/journey-messaging/make-com-setup#step-3-—-create-a-connection-inside-make-com).
Under **DS FlowTrigger** you will see all triggers you created in the flow editor — including `Make: payment data processed`.
In the field **Booking ID of guest** enter the full booking ID. The flow will then start exclusively for the journeys that belong to this booking.
The booking ID is critical: it is the only way for Journey Messaging to know which journeys the instruction applies to.
In our example the booking data comes from the payment provider's webhook — we can reference the booking number from there with a single click. With a different data source you can of course populate the booking number in any other way.
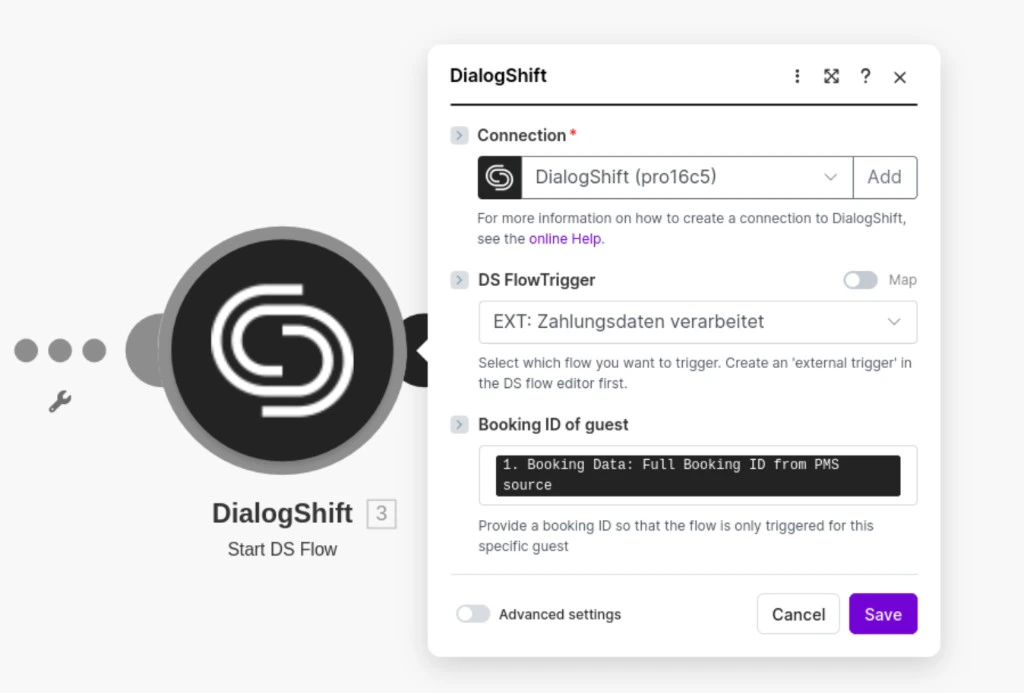 Save the module — and you are done. As soon as the module is executed inside the Make scenario, the Journey flow will run.
## Advanced: Start a flow without a booking ID
In specific situations — e.g. a promotional message to all currently checked-in guests — you may want to start the flow for many bookings at once.
Without a booking ID, the module fails by default (visible in the Make scenario editor). You can instead start the flow for **all currently checked-in guests**:
Leave the **Booking ID of guest** field blank.
Expand the **Advanced settings** section in the module configuration.
Activate the option **Trigger for all checked-in guests**.
"All checked-in guests" can potentially be a lot of guests — and that means a lot of messages. That is why this option must be enabled deliberately via the advanced settings. The booking-ID filter and the "all checked-in guests" option **cannot be combined**.
Because of delays in the Make scheduler, the filter cannot always be perfectly accurate: the check-in status is determined based on the moment the action runs.
## Troubleshooting
Checklist:
* Is the flow **activated** in Journey Messaging?
* Is the **API key** in the JM settings still valid?
* Is the **booking ID** transmitted correctly from Make.com? (Visible in the Make scenario editor.)
* Does the selected **DS FlowTrigger** match the external flow trigger in your DialogShift flow?
Without a booking ID, the flow does not run by default. Either fill in the booking ID or deliberately enable **Trigger for all checked-in guests** in the Advanced settings — see the section above.
Save the module — and you are done. As soon as the module is executed inside the Make scenario, the Journey flow will run.
## Advanced: Start a flow without a booking ID
In specific situations — e.g. a promotional message to all currently checked-in guests — you may want to start the flow for many bookings at once.
Without a booking ID, the module fails by default (visible in the Make scenario editor). You can instead start the flow for **all currently checked-in guests**:
Leave the **Booking ID of guest** field blank.
Expand the **Advanced settings** section in the module configuration.
Activate the option **Trigger for all checked-in guests**.
"All checked-in guests" can potentially be a lot of guests — and that means a lot of messages. That is why this option must be enabled deliberately via the advanced settings. The booking-ID filter and the "all checked-in guests" option **cannot be combined**.
Because of delays in the Make scheduler, the filter cannot always be perfectly accurate: the check-in status is determined based on the moment the action runs.
## Troubleshooting
Checklist:
* Is the flow **activated** in Journey Messaging?
* Is the **API key** in the JM settings still valid?
* Is the **booking ID** transmitted correctly from Make.com? (Visible in the Make scenario editor.)
* Does the selected **DS FlowTrigger** match the external flow trigger in your DialogShift flow?
Without a booking ID, the flow does not run by default. Either fill in the booking ID or deliberately enable **Trigger for all checked-in guests** in the Advanced settings — see the section above.